
Tutorial Export installed Linux to an ISO
Create an iSO from an existing Linux is possible ! This is a real advantages for client deployments, prepare a system (in a virtual machine for example) that can be exported easily using CD, USB, Linux PXE...
The generated iso will contain all the informations of the existing Linux, like Softwares, drivers, Users, configuration, ...
For this tutorial i am using Debian Jessie 8.6.
The generated iso will contain all the informations of the existing Linux, like Softwares, drivers, Users, configuration, ...
For this tutorial i am using Debian Jessie 8.6.
Create an ISO from installed Linux Using Refracta snapshot
Installing Refracta snapshot
Downloading the packages
Files can be found at the following address : https://sourceforge.net/projects/refracta/files/The main package is refractasnapshot-base_{version}_all.deb
Graphical interface package (optional) is refractasnapshot-gui_{version}_all.deb
I use the 9.3.4 because actually I can't have the 10.0.0 working, maybe a newer version can be available later.
Installing Dependencies
Refracta snapshot require some dependencies :- rsync
- squashfs-tools
- xorriso
- live-boot
- live-config
- live-boot-initramfs-tools
- live-config-sysvinit
- live-config-systemd
Installing the package rsync will add all other dependencies
copy to clipboard
apt-get install -f rsync
Installing Refracta snapshot
Once all dependencies installed, you can install the downloaded package using dpkg command line
dpkg command : copy to clipboard
dpkg -i refractasnapshot-base_9.3.4_all.deb
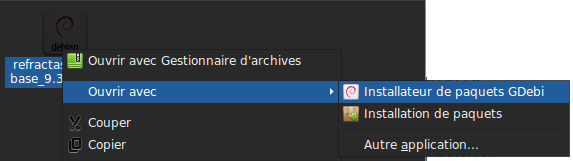
Or even using graphical interface with GDebi package installer for exemple
Cleanning your installed Linux (Optional)
Before creating the iso file with Refracta snapshot, you can clean your system, using for exemple BleachBitDownloading & Installing BleachBit
BleachBit software download can be found on the main web site https://www.bleachbit.org/As previously, you can install it using dpkg or using the graphical interface.
Clean up the system
Bleach bit offer an graphical interface easy to use available in administration menu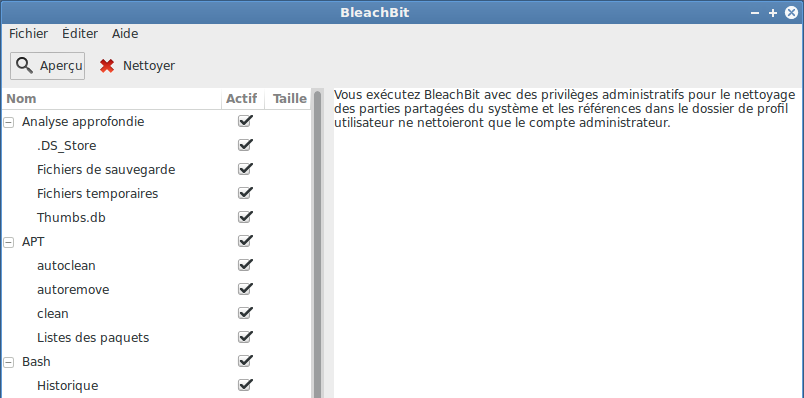
You can also use it using command lines :
to preview delete files : copy to clipboard
bleachbit --list | grep -E "[a-z]+\.[a-z]+" | xargs bleachbit --preview
to start the delete process :
copy to clipboard
bleachbit --list | grep -E "[a-z]+\.[a-z]+" | grep -v system.free_disk_space | xargs bleachbit --delete
Sources :
https://www.bleachbit.org/forum/delete-multiple-command-line-script-windows?page=0#comment-403 http://askubuntu.com/questions/671798/bleachbit-command-line-to-clean-all-options
Create an ISO using command lines
Options
You have some options available, you can set them with the graphical interface or edit the configuration file /etc/refractasnapshot.confmain options are : snapshot_dir & work_dir, you can let them as it is, it doesnt really matter, snapshot_dir will be where you will be able to find the generated iso file.
Starting the process
simply launch the command :
copy to clipboard
refractasnaphot
or use the graphical interface which will do the same [TODO : PUT HERE WARNING 4GB MAX ISO FILES ]
Testing
Once the iso generated & moved to somewhere, you should test it.Best ways are using virtual machines, but if you will use it in a PXE environement, that will not be enought, you will have to test it in PXE too.
If tests are successfull, keep your orignal linux to make updates in the futur, and you will be able to start again the process to create the updated iso files !
I still have some troubles :
- fstab entries are not restored
- lang is not restored
- splash screen isn't restored (i am using plymouth with solar)
- terminal as administrator no more ask root login to start (user is set as adminsitrator + group root)
- the iso boot on virtual machine but not on PXE linux