
Tutorial Using Syslinux to make bootable media
The SYSLINUX Project is a suite of lightweight master boot record (MBR) boot loaders for starting up IBM PC compatible computers with the Linux kernel. Primarily developed by H. Peter Anvin, the SYSLINUX bundle consists of several separate systems used for different purposes, including ISOLINUX, PXELINUX and EXTLINUX. (source wikipedia)
Create a bootable iso using syslinux
Getting the required files
To make a bootable iso using Syslinux, some files are required :- syslinux is the main package containing all syslinux filesize
- isolinux is the isolinux.bin used to boot by Syslinux
- genisoimage is the bin used to build the iso, it replace mkfsiso (obsolet)
Using Syslinux official files
Syslinux files are available on their web site : http://www.syslinux.org/wiki/index.php?title=DownloadFor all Syslinux version, you can find them on https://www.kernel.org/pub/linux/utils/boot/syslinux/
Using Debian Jessie packages
apt-get install syslinux isolinux genisoimage -y
For this tutorial i will use the lasted stable files available when this article is wrote, that mean Syslinux 6.03
Prepare ISO content file structure
you need to create the CD structure, and then set files. For this tutorial i will use the folder Workspace as the main folder and ISO the folder which will contain the iso files.Preparing files from official download files :
copy to clipboard#Create the Workspace folder in /var/tmp mkdir -p /var/tmp/Workspace/ISO/isolinux #Get the files wget https://www.kernel.org/pub/linux/utils/boot/syslinux/syslinux-6.03.tar.gz -P /var/tmp/Workspace/ #Extract the files tar -C /var/tmp/Workspace/ -xvzf /var/tmp/Workspace/syslinux-6.03.tar.gz #Copying require files cp /var/tmp/Workspace/syslinux-6.03/bios/core/isolinux.bin /var/tmp/Workspace/ISO/isolinux/ cp /var/tmp/Workspace/syslinux-6.03/bios/com32/menu/menu.c32 /var/tmp/Workspace/ISO/isolinux/ cp /var/tmp/Workspace/syslinux-6.03/bios/com32/libutil/libutil.c32 /var/tmp/Workspace/ISO/isolinux/ cp /var/tmp/Workspace/syslinux-6.03/bios/com32/elflink/ldlinux/ldlinux.c32 /var/tmp/Workspace/ISO/isolinux/ #Create empty configuration file touch /var/tmp/Workspace/ISO/isolinux/isolinux.cfg
Preparing files from debian jessie packages :
copy to clipboard#Get the files apt-get install syslinux isolinux genisoimage -y #Create the Workspace folder in /var/tmp mkdir -p /var/tmp/Workspace/ISO/isolinux #Copying require files cp /usr/lib/ISOLINUX/isolinux.bin /var/tmp/Workspace/ISO/isolinux/ cp /usr/lib/syslinux/modules/bios/menu.c32 /var/tmp/Workspace/ISO/isolinux/ cp /usr/lib/syslinux/modules/bios/libutil.c32 /var/tmp/Workspace/ISO/isolinux/ cp /usr/lib/syslinux/modules/bios/ldlinux.c32 /var/tmp/Workspace/ISO/isolinux/ #Create empty configuration file touch /var/tmp/Workspace/ISO/isolinux/isolinux.cfg
Some comments about thoose files :
- If you use another Linux distribution (or even older Debian), files can be find in some other directories, you may have to search them before.
- File are taken from the BIOS directory, the boot process won't work if EFI files are used instead.
The structure result should be :
Workspace +
|- ISO +
|- isolinux +
|- isolinux.bin
|- menu.c32
|- ldlinux.c32
|- libutil.c32
|- isolinux.cfg
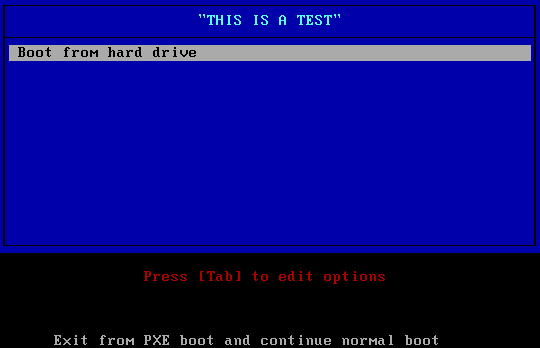
Edit isolinux.cfg file and set the menu which will be displayed (at the moment empty, it is just for testing boot process)
isolinux.cfg content :
copy to clipboard
cat <<EOF > /var/tmp/Workspace/ISO/isolinux/isolinux.cfg UI menu.c32 MENU TITLE "THIS IS A TEST" LABEL TEST MENU LABEL Back to boot proccess MENU DEFAULT LOCALBOOT 0 TEXT HELP Exit and continue normal boot ENDTEXT EOF
This menu isolinux.cfg is just displaying one entry, which when selected it launch the local hard drive boot process.
Some more explanation :
- UI menu.c32 is the interface used to render the boot menu
- MENU TITLE is the boot menu title
- LABEL TEST is the declaration of an entry to boot menu
- MENU LABEL is the displayed title of boot menu entry
- MENU DEFAULT mean this entry will be selected by default
- LOCALBOOT 0 is the command to exit and continue boot process
- TEXT HELP is the tooltip text displayed when the boot menu entry is selected
- LOCALBOOT 0 will continue the boot process order, so if you have CDrom,USB,Hard disk as boot order, when you leave CDrom menu you will continue on USB boot
- Menu entries can be found there : http://www.syslinux.org/wiki/index.php?title=Comboot/menu.c32
Make a bootable iso from files
genisoimageWill be used to create the bootable iso file.
This is the command
copy to clipboard
If no error occured, You should see now a file called bootable.iso in /var/tmp/Workspace/
genisoimage -rational-rock -volid "Testing ISO" -cache-inodes \ -joliet -full-iso9660-filenames -input-charset UTF8 \ -b isolinux/isolinux.bin \ -c isolinux/boot.cat \ -no-emul-boot -boot-load-size 4 -boot-info-table \ -output /var/tmp/Workspace/bootable.iso /var/tmp/Workspace/ISO/
- genisoimage has replace mkfsiso, but it works the same with mkfsiso, the command line should be a little different, but the result should be (almost) the same.
Result
Once the iso is generated, it can be tested.To test you can use for example a virtual machine with boot on CDrom option and the iso mounted in CDrom.
This is the result that should be displayed once the virtual machine started :
Automation
By the way, the script can be put in a single bash file to make the whole process.
makeBootableIso.sh
copy to clipboard
#Create the Workspace folder in /var/tmp mkdir -p /var/tmp/Workspace/ISO/isolinux #Get the files wget https://www.kernel.org/pub/linux/utils/boot/syslinux/syslinux-6.03.tar.gz -P /var/tmp/Workspace/ #Extract the files tar -C /var/tmp/Workspace/ -xvzf /var/tmp/Workspace/syslinux-6.03.tar.gz #Copying require files cp /var/tmp/Workspace/syslinux-6.03/bios/core/isolinux.bin /var/tmp/Workspace/ISO/isolinux/ cp /var/tmp/Workspace/syslinux-6.03/bios/com32/menu/menu.c32 /var/tmp/Workspace/ISO/isolinux/ cp /var/tmp/Workspace/syslinux-6.03/bios/com32/libutil/libutil.c32 /var/tmp/Workspace/ISO/isolinux/ cp /var/tmp/Workspace/syslinux-6.03/bios/com32/elflink/ldlinux/ldlinux.c32 /var/tmp/Workspace/ISO/isolinux/ #Create empty configuration file touch /var/tmp/Workspace/ISO/isolinux/isolinux.cfg #Set configuration file content cat <<EOF > /var/tmp/Workspace/ISO/isolinux/isolinux.cfg UI menu.c32 MENU TITLE "THIS IS A TEST" LABEL TEST MENU LABEL Back to boot proccess MENU DEFAULT LOCALBOOT 0 TEXT HELP Exit and continue normal boot ENDTEXT EOF # Create bootable.iso from ISO folder to Workspace genisoimage -rational-rock -volid "Testing ISO" -cache-inodes -joliet -full-iso9660-filenames \ -b isolinux/isolinux.bin -c isolinux/boot.cat \ -no-emul-boot -boot-load-size 4 -boot-info-table -input-charset UTF8 \ -output /var/tmp/Workspace/bootable.iso /var/tmp/Workspace/ISO/
This script can be customized and using Debian Syslinux package instead of official Syslinux download files for example ...
Do not forget that if you work in Windows, you may have trouble with line break "\r\n" (chr(10)chr(13)) characters
So you can clean you file using this little script :
remove windows \r copy to clipboard
tr -d '\r' < makeBootableIso.sh > temp.$$ && mv temp.$$ makeBootableIso.sh
Troubleshooting
stuck on copyright "Peter Anvin et Al"
You may have a trouble in your isolinux.cfg, for exemple a bad use of INCLUDE can make infinite loop.Try to comment some part of code until iso boot, you may find the problematic line.
stuck on copyright "Peter Anvin et Al" and _ is displayed right after
That mean you are using the wrong files (EFI files), you have to use BIOS files and not EFI to have a working bootable support that is started by computer BIOS."Failed to load COM32 file Menu.c32"
That mean some files are missing, check your isolinux folder, it should contain the following files from syslinux bios folder :
isolinux +
|- isolinux.bin
|- menu.c32
|- ldlinux.c32
|- libutil.c32
|- isolinux.cfg
error message "all to search_tree_file with an absolute path, stripping initial path separator. Hope this was intended... genisoimage: Uh oh, I cant find the boot catalog directory '/var/tmp/Workspace/ISO/isolinux'!"
The argument to -b has to be relative to the root of the filesystem you are creating, so use '-b isolinux/isolinux.bin' and it should work. The same thing applies to -c, you need '-c isolinux/boot.cat'. (source from internet)In other words
genisoimage will take the parameters -b isolinux/isolinux.bin & -c isolinux/boot.cat based on /var/tmp/Workspace/ISO/ path
Example : the option "-b /var/tmp/Workspace/ISO/isolinux/isolinux.bin" will search isolinux.bin in "/var/tmp/Workspace/ISO/var/tmp/Workspace/ISO/isolinux/isolinux.bin"
error message "genisoimage: Uh oh, I cant find the boot catalog directory 'isolinux'!"
Check your Workspace structure, you should have the same structure, and check files in isolinux folder :
Workspace +
          |- ISO +
                 |- isolinux +
                             |- isolinux.bin
                             |- menu.c32
                             |- ldlinux.c32
                             |- libutil.c32
                             |- isolinux.cfg
Trouble with local boot
Some models of computers, sometimes specific to BIOS and BIOS extension versions, do not work well with at least certain (but sometimes all) LOCALBOOT options (as of v3.70, available in all variants however PXELINUX interprets the option differently). As a workaround, use chain.c32 like this:LABEL localboot MENU LABEL Exit and continue boot process COM32 chain.c32 APPEND hd0This method requier to copy chain.c32 file to isolinux folder :
cp /var/tmp/Workspace/syslinux-6.03/bios/com32/chain/chain.c32 /var/tmp/Workspace/ISO/isolinux/source : www.syslinux.org/wiki/index.php?title=Hardware_Compatibility
Adding Entries to menu
Now you know how to create bootable iso, but it need to be more usefull than just offering an option to boot on local hard drive.
So next step is to add stuff to boot menu, customizing it, and then export the result to USB !
We will use reboot.c32 (reboot the compuer) & poweroff.c32 (shutdown the computer) files from Syslinux.
We will put them in a specific folder to have stuff ordered :
You can do this with almost all linux .bin files, like the most known example memtest+86.bin
You can find some other by searching on internet.
You can find some other by searching on internet.
Commodo rescue disk will be boot from an iso file, download can be found on official website www.comodo.com/
Lubuntu will be boot from a squashfs file, download can be found on official website lubuntu.net/
For an iso, it will be easy, just the iso requier to be copied on the Workpsace and will be start using the tool memdisk from Syslinux files.
For a live CD like lubuntu only some files are requiered (squashfs, initrd, vmlinuz found in casper folder).
This is how the workspace should look like
Debian files can be download on the official web site www.debian.org
It require to be a netboot version. for exemple http://ftp.debian.org/debian/dists/jessie/main/installer-amd64/current/images/netboot/netboot.tar.gz
Now the new iso can be generated using genisoimage command
This what should be deisplayed when the iso is booted :
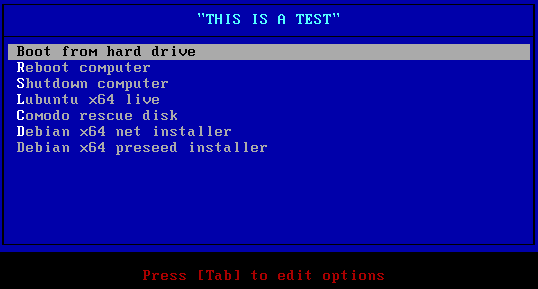 And each entries should works !
Be sure ignore_uuid command is present in APPEND line, and check the path you set in the isolinux.cfg file.
Check the command live-media-path, it must point on sqhashfs file folder, and not directly on the file.
So next step is to add stuff to boot menu, customizing it, and then export the result to USB !
Adding entries to boot menu
We will keep the boot basis from the previous chapterBasic bin
To not download/install more stuff, we will basically use the one from Syslinux files.We will use reboot.c32 (reboot the compuer) & poweroff.c32 (shutdown the computer) files from Syslinux.
We will put them in a specific folder to have stuff ordered :
Workspace +
          |- ISO +
                 |- isolinux +
                 |           |- isolinux.bin
                 |           |- menu.c32
                 |           |- ldlinux.c32
                 |           |- libcom32.c32
                 |           |- libutil.c32
                 |           |- isolinux.cfg
                 |
                 |- tools    +
                             |- reboot.c32
                             |- poweroff.c32
Copying the files
copy to clipboard
mkdir -p /var/tmp/Workspace/ISO/tools
cp /var/tmp/Workspace/syslinux-6.03/bios/com32/modules/reboot.c32 /var/tmp/Workspace/ISO/tools/
cp /var/tmp/Workspace/syslinux-6.03/bios/com32/modules/poweroff.c32 /var/tmp/Workspace/ISO/tools/
#requirement to have reboot & poweroff works
cp /var/tmp/Workspace/syslinux-6.03/bios/com32/lib/libcom32.c32 /var/tmp/Workspace/ISO/isolinux/
- Files are taken from BIOS folder, once again if files are taken from EFI folders, it won't works !
Adding the new entries to the boot menu
copy to clipboard
LABEL Reboot
	MENU LABEL ^Reboot computer
	KERNEL /tools/reboot.c32
	TEXT HELP
		Reboot the computer (you can use CTRL+ALT+SUPPR too)
	ENDTEXT

LABEL Shutdown
	MENU LABEL ^Shutdown computer
	KERNEL /tools/poweroff.c32
	TEXT HELP
		Shutdown the computer
	ENDTEXT
You can do this with almost all linux .bin files, like the most known example memtest+86.bin
KERNEL path/to/the/bin/memtest+86.bin
Extracting iso files (optional)
For the next steps, iso file can be used, i will explain in this part how to extract files from an iso, but if you use a compressed package (like tar.gz) this step can be skipped.Mounting an iso file
Using command line
copy to clipboard
You can access to iso file on the mounted folder
#Create a directory to serve as the mount location
mkdir /media/iso
#Mount the ISO in the target directory
mount -o silent,loop,ro path/to/iso/file/YOUR_ISO_FILE.ISO /media/iso
#To Unmount the ISO:
umount /media/iso
Uncompress the iso file
You need a tool for this like 7zip
copy to clipboard
#Installing 7zip
sudo apt-get install p7zip-full
#Extracting the iso
7z x disk.iso
Using graphical interface
There is some tools available to extract iso content like Furius ISO mountYou can find some other by searching on internet.
Using command line
copy to clipboard
or download it from launchpad.net/furiusisomount/+download
apt-get install furiusisomount
On Windows system
There is lot of tools available to do this, the most common is to use Winrar to open an iso file, or Daemon tools to mount an iso file.You can find some other by searching on internet.
Live system & software
For this section, I will use Lubuntu live & Commodo recue disk as example.Commodo rescue disk will be boot from an iso file, download can be found on official website www.comodo.com/
Lubuntu will be boot from a squashfs file, download can be found on official website lubuntu.net/
For an iso, it will be easy, just the iso requier to be copied on the Workpsace and will be start using the tool memdisk from Syslinux files.
For a live CD like lubuntu only some files are requiered (squashfs, initrd, vmlinuz found in casper folder).
Copying memdisk
copy to clipboard
cp /var/tmp/Workspace/syslinux-6.03/bios/memdisk/memdisk /var/tmp/Workspace/ISO/isolinux/
- Files are taken from BIOS folder, once again if files are taken from EFI folders, it won't works !
This is how the workspace should look like
Workspace +
          |- ISO +
                 |- isolinux +
                 |           |- memdisk
                 |           |- isolinux.bin
                 |           |- menu.c32
                 |           |- ldlinux.c32
                 |           |- libutil.c32
                 |           |- isolinux.cfg
                 |
                 |- images   +
                             |- lubuntu   +
                             |            |- filesystem.squashfs
                             |            |- initrd.lz
                             |            |- vmlinuz.efi
                             |
                             |- commodo   +
                                          |- comodo_rescue_disk_2.0.275239.1.iso
Adding the new entries to the boot menu
copy to clipboard
LABEL Lubuntulive
    MENU LABEL ^Lubuntu x64 live
    KERNEL /images/lubuntu/vmlinuz.efi
    INITRD /images/lubuntu/initrd.lz
    APPEND boot=casper live-media-path=/images/lubuntu/ ignore_uuid splash
    TEXT HELP
        Live boot on Lubuntu
    ENDTEXT

LABEL Comodo
    MENU LABEL ^Comodo rescue disk
    KERNEL memdisk
    INITRD /images/iso/comodo_rescue_disk_2.0.275239.1.iso
    APPEND iso raw
    TEXT HELP
        Live boot on Comodo rescue disk
    ENDTEXT
- Some explanation:
- KERNEL will be the kernel used for boot process
- APPEND are the parameters passed
- live-media-path mean where the squashfs file will be taken from loaded support, this is important if you use "file", "toram" or any options it might not works
- boot mean the type of boot, casper is for ubuntu distribution, debian distribution use live instead
- splash mean the splash screen will be displayed
- ignore_uuid prevent search squashfs file to be sreached in CD image by UUID but accept any other root device
- other option exist most of the time it depends of the program you are using -
There is other ways to boot on squashfs file, but with some inconvenient:
APPEND boot=casper file=/casper/filesystem.squashfs ignore_uuid
This requier casper folder & file to be at the root of the medium, so you can't have a multiboot with multiple casper folder at the medium root
APPEND cdrom-detect/try-usb=true persistent boot=casper file=/cdrom/casper/filesystem.squashfs ignore_uuid splash
Same as previsouly, casper folder has to be at the root of the medium
System installer
For this section, I will use Debian Jessie as example.Debian files can be download on the official web site www.debian.org
It require to be a netboot version. for exemple http://ftp.debian.org/debian/dists/jessie/main/installer-amd64/current/images/netboot/netboot.tar.gz
Workspace +
          |- ISO +
                 |- isolinux +
                 |           |- isolinux.bin
                 |           |- menu.c32
                 |           |- ldlinux.c32
                 |           |- libutil.c32
                 |           |- isolinux.cfg
                 |
                 |- images   +
                             |- debian    +
                                          |- vmlinuz
                                          |- initrd.gz
Using netboot
Adding the new entries to the boot menu
copy to clipboard
LABEL DebianInstallN
	MENU LABEL ^Debian x64 net installer
	KERNEL /images/debian/linux
	INITRD /images/debian/initrd.gz
	TEXT HELP
		Debian netboot installer
	ENDTEXT
Using preseed
Adding the new entries to the boot menu
copy to clipboard
LABEL DebianInstallP
	MENU LABEL ^Debian x64 preseed installer
	KERNEL /images/debian/linux
	INITRD /images/debian/initrd.gz
	APPEND preseed/url=http://192.168.0.2/debian/preseed.cfg
	TEXT HELP
		Debian installer using preseed
	ENDTEXT
- preseed file cas be set in different way but with restriction :
preseed/url=http://host/path/to/preseed.cfg
preseed/url=tftp://host/path/to/preseed.cfg
preseed/file=/cdrom/preseed.cfg
preseed/file=/hd-media/preseed.cfg
A checksum can be added too
-
more information on preseed at :
Using full installer
- At the moment i didin't found how to install from the full installer with a custom path, an error occur : "Incorrect CD-ROM detected. The CD-ROM drive contains a CD which cannot be used for installation"
Full configuration combined
This is how the workspace should look like
Workspace +
          |- ISO +
                 |- isolinux +
                 |           |- memdisk
                 |           |- isolinux.bin
                 |           |- menu.c32
                 |           |- ldlinux.c32
                 |           |- libcom32.c32
                 |           |- libutil.c32
                 |           |- isolinux.cfg
                 |
                 |- tools    +
                 |           |- reboot.c32
                 |           |- poweroff.c32
                 |
                 |- images   +
                             |- debian    +
                             |            |- linux
                             |            |- initrd.gz
                             |
                             |- lubuntu   +
                             |            |- filesystem.squashfs
                             |            |- initrd.lz
                             |            |- vmlinuz.efi
                             |
                             |- commodo   +
                                          |- comodo_rescue_disk_2.0.275239.1.iso
This is how the isolinux.cfg look like
copy to clipboard
UI menu.c32

MENU TITLE "THIS IS A TEST"

LABEL TEST
    MENU LABEL Back to boot proccess
    MENU DEFAULT
    LOCALBOOT 0
    TEXT HELP
        Exit and continue normal boot
    ENDTEXT

LABEL Reboot
    MENU LABEL ^Reboot computer
    KERNEL /tools/reboot.c32
    TEXT HELP
        Reboot the computer (you can use CTRL+ALT+SUPPR too)
    ENDTEXT

LABEL Shutdown
    MENU LABEL ^Shutdown computer
    KERNEL /tools/poweroff.c32
    TEXT HELP
        Shutdown the computer
    ENDTEXT

LABEL Lubuntulive
    MENU LABEL ^Lubuntu x64 live
    KERNEL /images/lubuntu/vmlinuz.efi
    INITRD /images/lubuntu/initrd.lz
    APPEND boot=casper live-media-path=/images/lubuntu/ ignore_uuid splash
    TEXT HELP
        Live boot on Lubuntu
    ENDTEXT

LABEL Comodo
    MENU LABEL ^Comodo rescue disk
    KERNEL memdisk
    INITRD /images/commodo/comodo_rescue_disk_2.0.275239.1.iso
    APPEND iso raw
    TEXT HELP
        Live boot on Comodo rescue disk
    ENDTEXT

LABEL DebianInstallN
	MENU LABEL ^Debian x64 net installer
	KERNEL /images/debian/linux
	INITRD /images/debian/initrd.gz
	TEXT HELP
		Debian netboot installer
	ENDTEXT

LABEL DebianInstallP
	MENU LABEL ^Debian x64 preseed installer
	KERNEL /images/debian/linux
	INITRD /images/debian/initrd.gz
	APPEND preseed/url=http://192.168.0.2/debian/preseed.cfg
	TEXT HELP
		Debian installer using preseed
	ENDTEXT
Now the new iso can be generated using genisoimage command
# Create bootable.iso from ISO folder to Workspace
genisoimage -rational-rock -volid "Testing ISO" -cache-inodes -joliet -full-iso9660-filenames \
-b isolinux/isolinux.bin -c isolinux/boot.cat \
-no-emul-boot -boot-load-size 4 -boot-info-table -input-charset UTF8 \
-output /var/tmp/Workspace/bootable.iso /var/tmp/Workspace/ISO/
Result
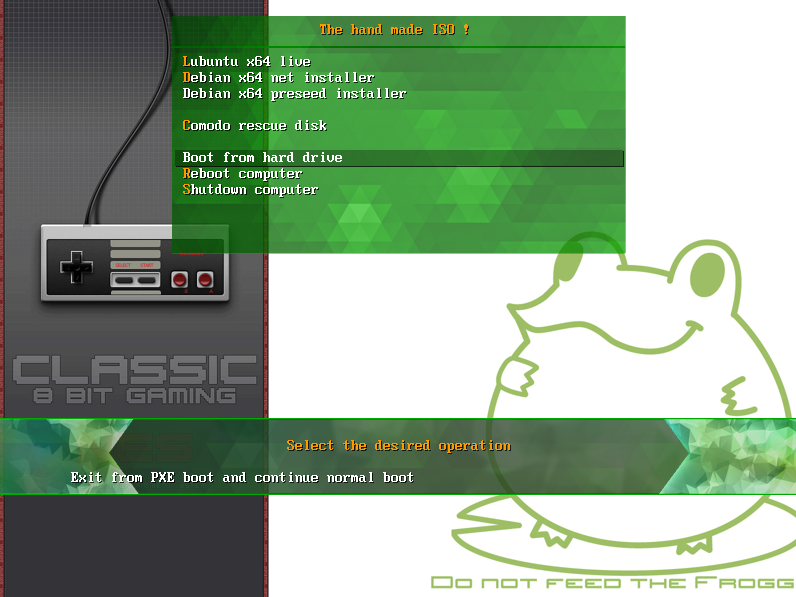
Once generated, you can test the iso file on a virtual machine for example.This what should be deisplayed when the iso is booted :
And each entries should works !
More example ...
You can find more example (that need to be adapted, but that could be a good exercice) looking at the page Linux PXE on Windows Deployment ServicesTroubleshooting
The common error message is initramfs unable to find a medium containing a live file system theat mean the APPEND parameter line should contain errors.Be sure ignore_uuid command is present in APPEND line, and check the path you set in the isolinux.cfg file.
Check the command live-media-path, it must point on sqhashfs file folder, and not directly on the file.
Customizing boot menu
Ok, now the content is there, but display is like from the 80's, it really need to be pimped to look like modern stuff !
We will see how in this part ^_^
This is the main commands :
KERNEL recognized extension (case sensitive)
source : www.syslinux.org/wiki/index.php?title=SYSLINUX#KERNEL_file
You can set an background image to make the display look really better.
We will see how in this part ^_^
Syslinux menu main commands
Lots of options are available to set your Syslinux menu, all commands can be found on the official web site : http://www.syslinux.org/wiki/index.php?title=MenuThis is the main commands :
LABEL
copy to clipboard#Set a line selected as default, with text help on selection over LABEL Local MENU LABEL ^Back to boot proccess MENU DEFAULT LOCALBOOT 0 TEXT HELP Exit and continue normal boot ENDTEXT
MENU BEGIN
copy to clipboard#Create a menu entry (sub level of menu) MENU BEGIN sTools MENU TITLE ^System Security Tools INCLUDE isolinux/menu_stools.cfg MENU END
MENU EXIT
copy to clipboard#back to parent menu (exit a sub level) LABEL Back MENU LABEL ^Back to main menu MENU EXIT TEXT HELP Go back to main menu ENDTEXT
INDENT
copy to clipboardLABEL Shutdown MENU LABEL ^Shutdown computer MENU INDENT 2 KERNEL /tools/poweroff.c32
KERNEL recognized extension (case sensitive)
| .0 | PXE bootstrap program (NBP) [PXELINUX only] |
| .bin | "CD boot sector" [ISOLINUX only] |
| .bs | Boot sector [SYSLINUX only] |
| .bss | Boot sector, DOS superblock will be patched in [SYSLINUX only] |
| .c32 | COM32 image (32-bit COMBOOT) |
| .cbt | COMBOOT image (not runnable from DOS) |
| .com | COMBOOT image (runnable from DOS) |
| .img | Disk image [ISOLINUX only] |
-
Note :
MENU DEFAULT will be the default menu selected ^ before menu title is used to Highlight the first letter
it doesn't works on MENU BEGIN and all first letters have to be unique, else only the first occurence will be highlighted
\ can be added at the end of line to split the line command
More command can be found at : www.syslinux.org/wiki/index.php?title=Comboot/menu.c32
Some more informations on command APPEND
The command APPEND accept parameters depending of what you are using in KERNEL, to illustrate I will use debian based options (for information ubuntu is debian based) :APPEND debian-installer/language=fr console-setup/layoutcode=fr local=fr_FR quiet splashWill set local as FR (french) with keyboard FR (azerty) no verbose and display the splash screen
Using vesamenu.c32
To enhance interface, we need to use more than menu32.c32 which is limited, there is some libraries to do it, but for the next steps we will use vesamenu.c32 available in syslinux package.You can set an background image to make the display look really better.
copying vesamenu.c32 file
copy to clipboard
cp /var/tmp/Workspace/syslinux-6.03/bios/com32/menu/vesamenu.c32 /var/tmp/Workspace/ISO/isolinux/
This is my menu configuration :
copy to clipboard
#Enable advanced display
UI vesamenu.c32

###[ Text ]###
MENU TITLE The hand made ISO !
MENU TABMSG Select the desired operation

###[ Configuration ]###
#no prompt (value = 0/1)
PROMPT 0
#no timeout (not required)
TIMEOUT 0
#disable ESC from the keybord (value = 0/1)
NOESCAPE 1
#display TAB options (not required value = 0/1)
ALLOWOPTIONS 1

###[ Display ]###
MENU BACKGROUND /isolinux/frogg.png
MENU RESOLUTION 800 600
MENU MARGIN 20

# Text position
#MENU WIDTH 200 (replace the 100% width with fixed width ... not that good)
#MENU ROWS 28 (doing nothing ?)
#MENU ENDROW 15 (doing nothing ?)
MENU CMDLINEROW 34
MENU HELPMSGROW 29
MENU TABMSGROW 28
MENU PASSWORDROW 8

# Color
MENU COLOR BORDER		0 #00000000 #00000000 none
MENU COLOR TITLE		0 #FFFF9900 * *
MENU COLOR SEL			0 #FFFFFFFF #85000000 *
MENU COLOR UNSEL		0 #FFFFFFFF * *
MENU COLOR HOTKEY		0 #FFFF9900 * *
MENU COLOR HOTSEL		0 #FFFFFFFF #85000000 *
MENU COLOR TABMSG		0 #FFFF9900 * *
MENU COLOR HELP 		0 #FFFFFFFF * *
MENU COLOR PWDHEADER		0 #FFFF9900 #FF006400 std
MENU COLOR PWDBORDER		0 #AAFF9900 #AA006400 std
MENU COLOR PWDENTRY		0 * * *

#I don't know what this could be, but i tried
MENU COLOR CMDLINE		0 #FF006400 * *
MENU COLOR CMDMARK		0 #FF006400 * *
MENU COLOR MSG07		0 #FF006400 * *
MENU MSGCOLOR 			  #FF006400 #80ffffff std
Full configuration file
isolinux.cfg
copy to clipboard
DEFAULT menu.c32

#Enable advanced display
UI vesamenu.c32

###[ Text ]###
MENU TITLE The hand made ISO !
MENU TABMSG Select the desired operation

###[ Configuration ]###
#no prompt (value = 0/1)
PROMPT 0
#no timeout (not required)
TIMEOUT 0
#disable ESC from the keybord (value = 0/1)
NOESCAPE 1
#display TAB options (not required value = 0/1)
ALLOWOPTIONS 1

###[ Display ]###
MENU BACKGROUND /isolinux/frogg.png
MENU RESOLUTION 800 600
MENU MARGIN 20

# Text position
#MENU WIDTH 200 (replace the 100% width with fixed width ... not that good)
#MENU ROWS 28 (doing nothing ?)
#MENU ENDROW 15 (doing nothing ?)
MENU CMDLINEROW 34
MENU HELPMSGROW 29
MENU TABMSGROW 28
MENU PASSWORDROW 8

# Color
MENU COLOR BORDER		0 #00000000 #00000000 none
MENU COLOR TITLE		0 #FFFF9900 * *
MENU COLOR SEL			0 #FFFFFFFF #85000000 *
MENU COLOR UNSEL		0 #FFFFFFFF * *
MENU COLOR HOTKEY		0 #FFFF9900 * *
MENU COLOR HOTSEL		0 #FFFFFFFF #85000000 *
MENU COLOR TABMSG		0 #FFFF9900 * *
MENU COLOR HELP 		0 #FFFFFFFF * *
MENU COLOR PWDHEADER		0 #FFFF9900 #FF006400 std
MENU COLOR PWDBORDER		0 #AAFF9900 #AA006400 std
MENU COLOR PWDENTRY		0 * * *

#I don't know what this could be, but i tried
MENU COLOR CMDLINE		0 #FF006400 * *
MENU COLOR CMDMARK		0 #FF006400 * *
MENU COLOR MSG07		0 #FF006400 * *
MENU MSGCOLOR 			  #FF006400 #80ffffff std

###[ lubnutu live ]###
LABEL Lubuntulive
    MENU LABEL ^Lubuntu x64 live
    KERNEL /images/lubuntu/vmlinuz.efi
    INITRD /images/lubuntu/initrd.lz
    APPEND boot=casper live-media-path=/images/lubuntu/ ignore_uuid splash
    TEXT HELP
        Live boot on Lubuntu
    ENDTEXT

###[ Debian net installer ]###
LABEL DebianInstallN
	MENU LABEL ^Debian x64 net installer
	KERNEL /images/debian/linux
	INITRD /images/debian/initrd.gz
	TEXT HELP
		Debian netboot installer
	ENDTEXT

###[ Debian preseed installer ]###
LABEL DebianInstallP
	MENU LABEL ^Debian x64 preseed installer
	KERNEL /images/debian/linux
	INITRD /images/debian/initrd.gz
	APPEND preseed/url=http://192.168.0.2/debian/preseed.cfg
	TEXT HELP
		Debian installer using preseed
	ENDTEXT

###[ blank spacer ]###
MENU SEPARATOR

###[ comodo rescue disk ]###
LABEL Comodo
    MENU LABEL ^Comodo rescue disk
    KERNEL memdisk
    INITRD /images/commodo/comodo_rescue_disk_2.0.275239.1.iso
    APPEND iso raw
    TEXT HELP
        Live boot on Comodo rescue disk
    ENDTEXT

###[ blank spacer ]###
MENU SEPARATOR

###[ Local boot ]###
LABEL Localboot
    MENU LABEL Back to boot proccess
    MENU DEFAULT
    LOCALBOOT 0
    TEXT HELP
        Exit and continue normal boot
    ENDTEXT

###[ Reboot ]###
LABEL Reboot
    MENU LABEL ^Reboot computer
    KERNEL /tools/reboot.c32
    TEXT HELP
        Reboot the computer (you can use CTRL+ALT+SUPPR too)
    ENDTEXT

###[ Shutdown ]###
LABEL Shutdown
    MENU LABEL ^Shutdown computer
    KERNEL /tools/poweroff.c32
    TEXT HELP
        Shutdown the computer
    ENDTEXT
- The menu option doesn't offer a nice display, the trick is to remove all borders and backgrounds and then add to the Image fake border and background for the menu
Result
Going further
Make an USB bootable from bootable iso file
So, now we have a bootable iso with lot of stuff on it, what could we do more ?The next step will be send this iso to an USB bootable key, so you can now have your custom software in your pocket, to be able to use them at any moment...(you can/need :P)
You need to know that the following method will make the key not readable on Windows system. The key can be formated on Windows if need to works on it, but data cannot be read !
isohybrid Installation
To convert the iso in hybrid iso you will need isohybrid
command :
copy to clipboard
apt-get install syslinux-utils
find your usb key
To find your usb on the system, yuo must have connected it first, then you can find it using command lines.There is multiple ways to do it.
Whatever the command you use for it, be really sure to know where your USB key is, else you could lost data by doing bad manipulation
using the command "lsblk"
typing lsblk should display all your drive medium :NAME MAJ:MIN RM SIZE RO TYPE MOUNTPOINT fd0 2:0 1 4K 0 disk sda 8:0 0 25G 0 disk ├─sda1 8:1 0 24G 0 part / ├─sda2 8:2 0 1K 0 part └─sda5 8:5 0 1,1G 0 part [SWAP] sdb 8:16 1 7,6G 0 disk └─sdb1 8:17 1 7,6G 0 part /media/user/USB DISK
using the command "fdisk -l"
typing fdisk -l should display all your drive medium :Device Boot Start End Sectors Size Id Type /dev/sdb1 56 15851519 15851464 7,6G b W95 FAT32In my case, USB Key is /dev/sdb
un mount the usb key
umount /dev/sdb1
format your USB Key to be fat32
mkdosfs -n 'Bootable Key' -I /dev/sdb -F 32
make the iso as hybrid iso
The iso is working on CDrom device, but it requier to be hybrid iso to be recognized by BIOSisohybrid /var/tmp/Workspace/bootable.iso
copy iso to USB Key
dd if=/var/tmp/Workspace/bootable.iso of=/dev/sdbMake sure you are copying iso to USB Key (sdb in my case), not on his partition (sdb1).
Result
Now you can test it, by booting on it (by the way not all computer can do this operation).To set computer boot on USB Key you have configure computer BIOS boot order.
Once done, this should appear :
Troubleshooting
Trouble with local boot
As USB is considered as LOCALBOOT 0, the LOCALBOOT 0 entry won't work correctly, this is how you can pass through :LABEL localboot MENU LABEL Exit and continue boot process LOCALBOOT -1-1 (minus one) : Cause the boot loader to report failure to the BIOS, which, on recent BIOSes, should mean that the next boot device in the boot sequence should be activated.
Source : www.syslinux.org/wiki/index.php?title=SYSLINUX#LOCALBOOT_type
Trouble with shutdown
Error message :APM not presentSyslinux use APM to shudown the computer if it is disabled or doesn't available, shutdown won't work.
You can try to replace shutdown.c32 from Syslinux by acpioff.c32
Using a script automation
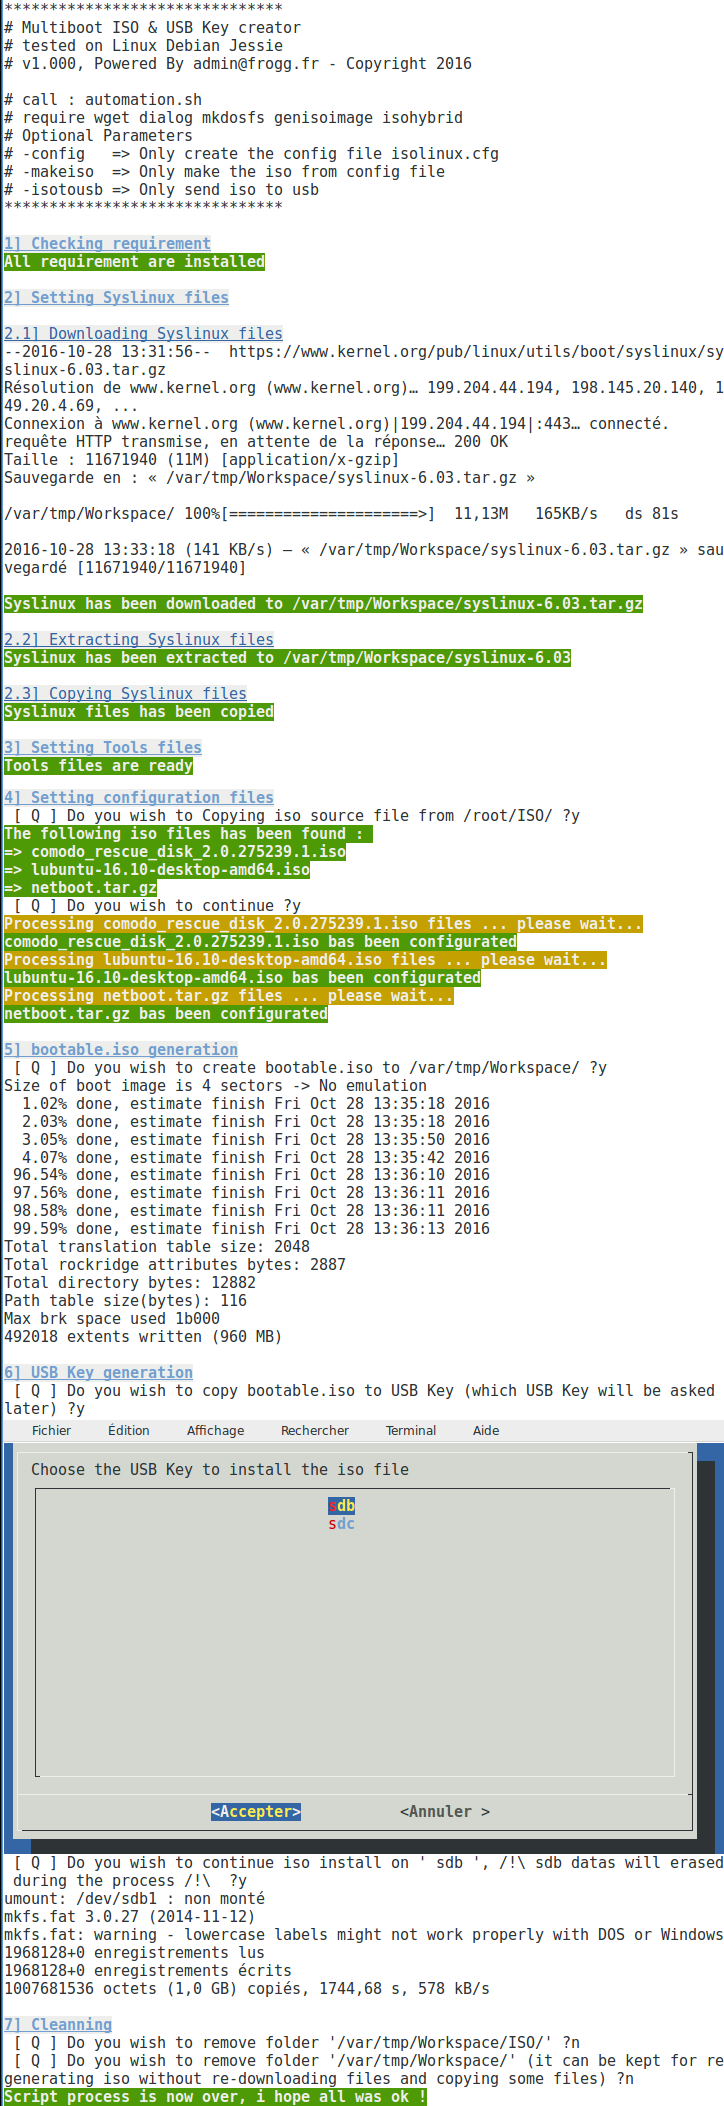
Based on this article, here you can find a bash script to automatize Multiboot generation and create an ISO file that can be exported to an USB Key :Source on Gitub
As the code is in bash it is open source and easy to modify if required.
By the way I allow to use and modify it without any credits, for any kind of use (private or even commercial).
the USB selector is based on the post unix.stackexchange.com/questions/60299/how-to-determine-which-sd-is-usb
- This script might not work for all live/install files, but i try to do it ! Make test once done to be sure ^_^
Script in action
Other applications
There is lot of possibilities with Syslinux, you can find here 2 applications :- Syslinux for Linux PXE on Windows Deployment Services
- Use Syslinux to boot an ISO created from running Linux
- Once finished, don't forget to clean your Workspace !
Any questions...?
You can use the contact form to ask questionThe easy way
You can find tools with graphical interface which automatize USB Key creation from iso files, like :
- Multi system/
- MultiBoot USB
- YUMI
- Win to flash
- and some more other...